
Home Wi-Fi Router Setup
Configuration Self Help
SyncWave Internet requires your router to be configured properly. Anytime a router is reset, replaced, or has a settings change, you need to be sure that it is configured to SyncWave standards or else your Internet may not work. A router that is not configured properly will cause your Internet access to be slow, intermittent, or not work at all. SyncWave offers a router maintenance and support subscription called Equipment Pro for customers looking to have their routers professionally maintained. To configure your router yourself, be sure to follow one of these sets of instructions below.
Generic Home Router
SCENARIO I: IF YOUR ROUTER SUPPORTS ACCESS POINT MODE
- Login to your router by following the manufacturer’s instructions
- Set router to Access Point Mode (also known as Bridge Mode)
- Set these settings statically:
- LAN IP: 192.168.3.2
- NETMASK: 255.255.255.0
- GATEWAY: 192.168.3.1
- PRIMARY DNS: 23.132.80.61
- SECONDARY DNS: 1.1.1.1
- Allow the router to reboot
- NOTE: With the router in AP (Access Point) Mode, you may plug the Internet cable into the WAN port
- Log back into the router by navigating your browser to 192.168.3.2
- Change the SSID (the wireless name) to be what you would like
- Change the wireless password to be what you like
- Ensure that your router is using wireless channel(s) that are free of interference, and a 20 MHz channel width should be used for all wireless channels.
SCENARIO II: IF YOUR ROUTER DOES NOT SUPPORT ACCESS POINT MODE
- Login to your router by following the manufacturer’s instructions
- Disable the DHCP server
- Set the LAN IP address to 192.168.3.2
- Save these changes and allow the router to reboot
- IMPORTANT: While the router is rebooting, make sure that all cables are plugged into the LAN ports on the router and that the WAN port contains nothing
- Once the router reboots, navigate your browser to 192.168.3.2 to log back into the router
- Change the SSID (the wireless name) to be what you would like
- Change the wireless password to be what you like
- Ensure that your router is using wireless channel(s) that are free of interference, and a 20 MHz channel width should be used for all wireless channels.
TP Link TL-WR841N
1. Connect to your router
a. Ensure your router is not connected to the Internet
b. Wired method: plug your PC into one of the LAN ports
c. Wireless method: connect to your router’s SSID and enter the password found on the bottom of the router
2. Navigate your web browser to 192.168.0.1, the router’s default IP address
3. You may be asked to make a new administrator login password for your router (this is different from your Wi-Fi password) and then you will be logged in
- NOTE: If you are asked instead to enter a username and a password, then try “admin” for both the username and the password
4. Put the router into Access Point mode
- Click on Operation Mode
- Select Access Point mode
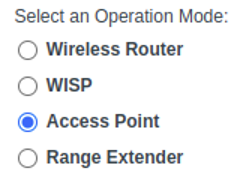
- Click on Save
- Allow the device to reboot
5. Log back in
- You may need to type http://tplinkwifi.net into your browser to access the router
- If you cannot access your router:
- Ensure your router is disconnected from the Internet
- Ensure your device does not have static IP settings
- Reboot the router
- Try again using the above URL
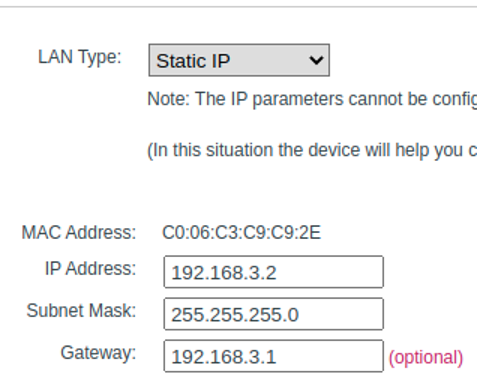
6. Change the LAN address
- Click on Network -> LAN
- Set LAN Type to Static IP
- Change the IP Address to 192.168.3.2
- Change the Gateway to 192.168.3.1
- Click on Save and allow the router to reboot
- Once the router has rebooted, you will need to type 192.168.3.2 into your web browser if it did not load automatically
7. Disable the DHCP server
- Go to DHCP -> DHCP Settings
- Set DHCP Server to Disable
- Gateway: 192.168.3.1
- DNS Server: 23.132.80.61
- Secondary DNS Server: 1.1.1.1
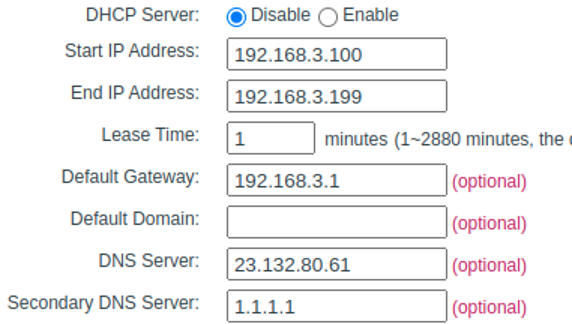
- Click on Save
- You must now connect your router to the Internet! If you cannot access your router after this, then reboot your router and try again.
8. Change the wireless settings
- Setup the WiFi name and channel
- Go to Wireless -> Basic Settings
- Wireless Network Name: This is your WiFi name
- Mode: 11bgn mixed
- Channel Width: 20 MHz v. Channel: set this to a channel free of interference or leave it as Auto
- Change the WiFi password
- Go to Wireless -> Wireless Security
- Leave the settings as WPA/WPA2 – Personal (Recommended)
- Change the Wireless Password to be what you’d like
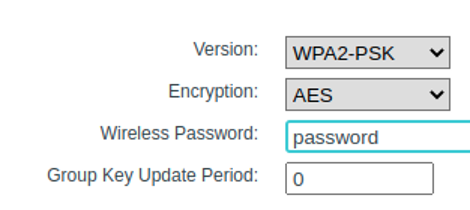
- Click on Save
9. You are done!!
TP Link Archer A6
1. Connect to your router
- Ensure your router is not connected to the Internet
- Wired method: plug your PC into one of the LAN ports
- Wireless method: connect to your router’s SSID and enter the password found on the bottom of the router
2. Login to your router
- a. Navigate your browser to 192.168.0.1 (TP Link’s default LAN IP address)
- You should be asked to create an administrator password
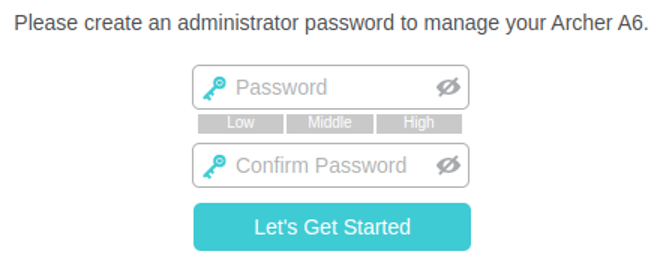
3. Create an administrator password
- Create and confirm a password that meets the security requirements
- Remember this password because you will need it to login into the router again
4. Put the router into Access Point mode
- a. Click on the Advanced tab
- Click on Operation Mode
- Click on Access Point and then click Save
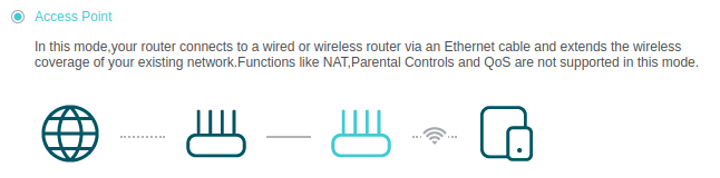
- Allow the router to reboot
5. Log back in
- You may need to use http://tplinkwifi.net to access the router again
- If you are unable to login to your router, then:
- Ensure your router is disconnected from the Internet
- Ensure your device does not have static IP settings
- Reboot the router
- Try again using the above URL
6. Change the LAN IP address
- Go to Network -> LAN
- Change the LAN IP to Static IP
- IP Address: 192.168.3.2
- Subnet Mask: 255.255.255.0
- Default Gateway: 192.168.3.1

- Click on Save g. Allow the router to reboot
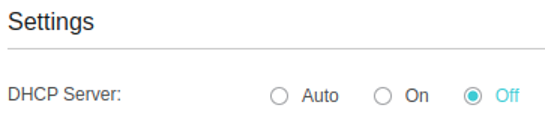
7. Disable DHCP server
- Log back in at 192.168.3.2
- Go to Network -> DHCP Server
- Disable the DHCP serve by turning DHCP Server to Off
- You must now connect your router to the Internet! If you cannot access your router after this, then reboot your router and try again.
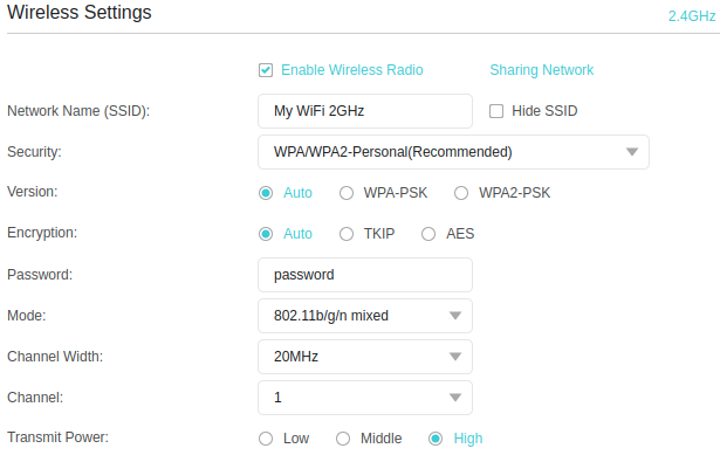
8. Change the wireless settings
- 2.4 GHz Settings:
- Go to Wireless -> Wireless Settings
- Network Name (SSID): set this to what you would like it to be
- Security: WPA/WPA2-Personal (Recommended)
- Version: Auto
- Encryption: Auto
- Password: set this to what you would like it to be
- Mode: 802.11b/g/n mixed
- Channel Width: 20 MHz
- Channel: set this to a channel free of interference or set to Auto
- Transmit Power: High
- Click on Save
- 5 GHz Settings:
- Go to Wireless -> Wireless Settings
- Network Name (SSID): set this to what you would like it to be
- Security: WPA/WPA2-Personal (Recommended)
- Version: Auto
- Encryption: Auto
- Password: set this to what you would like it to be
- Mode: 802.11b/g/n mixed
- Channel Width: 20 MHz
- Channel: set this to a channel free of interference or set to Auto
- Transmit Power: High
- Click on Save
9. You are done!